How to set up a new author website with DreamHost in 15 minutes
By Maria Korolov
I recently wrote an article about how to set up a free author website with WordPress.com.
But sometimes, an author might prefer to have a self-hosted site using a third-party provider.
The main benefit? More features, at a lower cost.
Because, although WordPress.com is free, it’s only free for the basic level. You wind up with ads, you have to have a WordPress.com domain name instead of getting your own domain, you can’t have plugins, and you only get a limited number of themes and fonts. Now, that might work for you. But if it doesn’t, you’ll have to upgrade.
For $48 a year, you’ll get free domain name, but only for the first year. And you’ll get a few more themes. But you still can’t have plugins, and you can’t upload videos or install plugins. To get videos, plugins, and Google Analytics — all of which you’ll want on an author site — you’ll need to pay $300 a year. Yikes!
So let’s look at the top options for third-party hosting. These are firms that host more a million websites, and are recommended by top-tier technology magazines like PCMag and CNET.
For an author website, where you’ll probably get low traffic and won’t need any interactivity — unless you hire a developer to build a custom game for you! — you’ll want the basic shared hosting option. I’m going to compare the prices and top features for their regular price — most will have a promotion for the first year, but then prices will go up afterwards.
DreamHost
- $84 per year ($36 first year)
- Free domain name for the first year
- 50GB of storage
- Unlimited traffic
- Automated backups
- Free security certificate
- Email for an additional $20 per year
- One-click WordPress install
I personally use Dreamhost and like them a lot. I’ve been using them for years, and run both big and small websites on them, and their support and uptime has been excellent. This website runs on DreamHost, and so does Hypergrid Business and MariaKorolov.com and Krim World and a bunch of other sites I’ve got set up for friends and organizations.
They are recommended by WordPress.org, were PCMag’s “editor’s choice” winner five years in a row, and are employee owned. Also, they host 1.5 million websites. In my opinion, they’re the best platform out there and offer the best features for the lowest price.
Sign up here — and scroll down to see my tutorial on how to set up a WordPress site with them in just a few minutes.
GoDaddy
- $108 per year ($84 first year)
- Free domain for the first year
- 25GB of storage
- Unlimited traffic
- Security certificate for additional $95 per year (free for first year)
- No automated backups
- Email for $24 a year (free for the first year)
- One-click WordPress install
According to BuiltWith, more than 17 million websites use GoDaddy, making them the top website hosting provider in the world.
BlueHost
- $120 per year ($60 first year)
- Free domain for the first year
- 50GB of storage
- Unlimited traffic
- Free security certificate
- No automated backups
BlueHost is another super-popular platform for self-hosted WordPress sites, hosting more than 2 million sites.
HostGator
- $108 per year ($47first year)
- Free domain for the first year
- Unlimited storage traffic
- Free security certificate
- Free email
- Automated backups
- One-click WordPress install
With more than 2 million sites hosted, HostGator is PCMag’s top choice overall.
Setting up a DreamHost site takes less than 15 minutes
All of these providers make it easy to set up a new WordPress website.
In my opinion, DreamHost’s system is the easiest, but that’s probably because I’ve been using the company for so long and know the system well.
But, just so you can see what it’s like, I went through and created a brand-new account and set up a brand-new website. The one-click WordPress install is, in fact, a single click — once you’ve entered your payment information, of course.
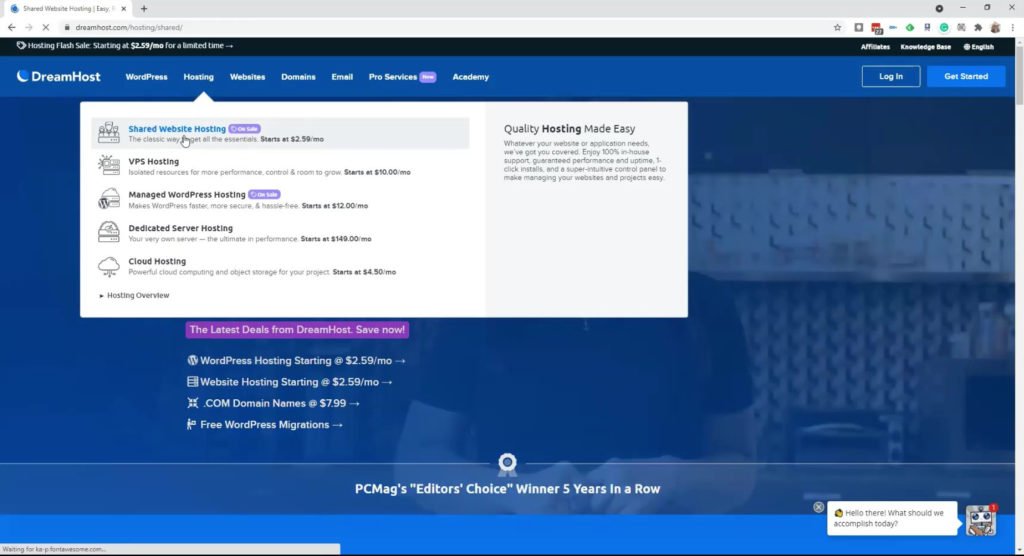
On the DreamHost site, go to “Shared Website Hosting.” You don’t care if your server is also used by other websites. A difference of a microsecond in access speed makes a big difference to giant e-commerce websites. But for a small author site, it’s not a big deal whatsoever. Especially since your site is going to be cached by default. Plus, you can add free global CloudFlare support after you’ve set up the site, if you want it to load very quickly from anywhere in the world.
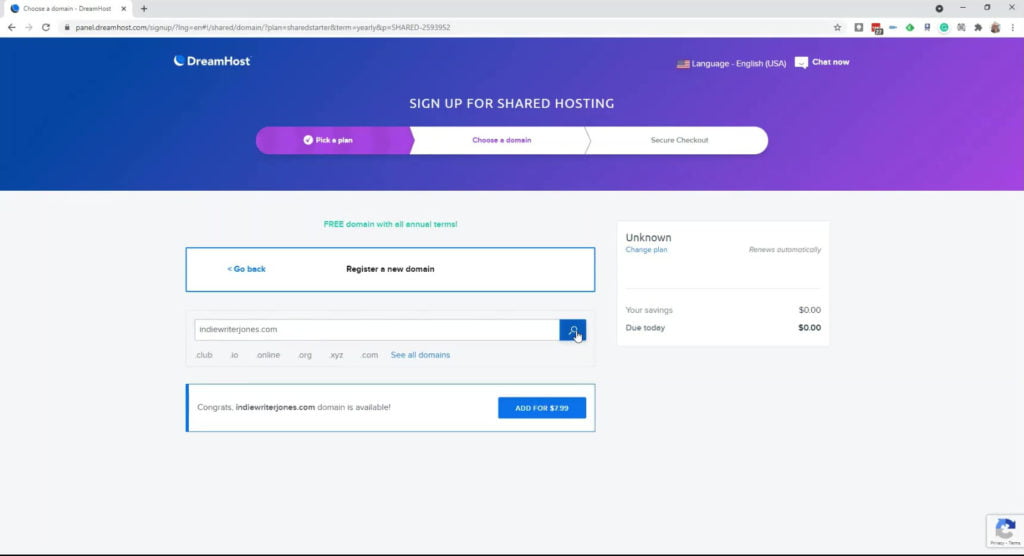
Sign up for your new domain. Above, you can see that DreamHost’s regular price for a dot-com domain is just $7.99 a year. But we’re going to get that for free with our plan if we sign up for a whole year.
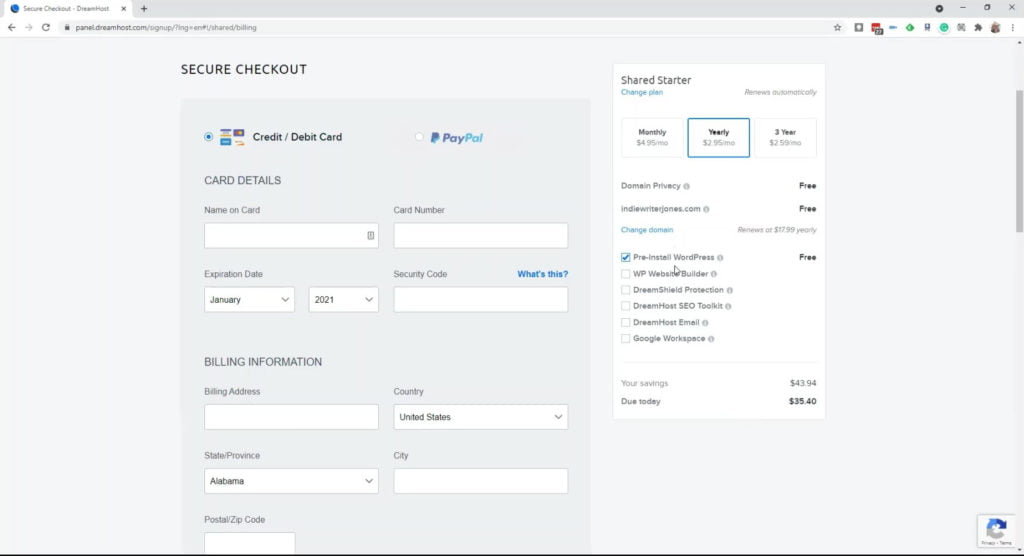
Now go through the usual signup and payment process. I’ve selected the “Yearly” plan, which is $2.95 a month — that’s $35.40 for the whole year.
Sometimes, DreamHost has other deals, too. I’ve seen it offer websites for a lot lower, and deals where the free domain is included every year.
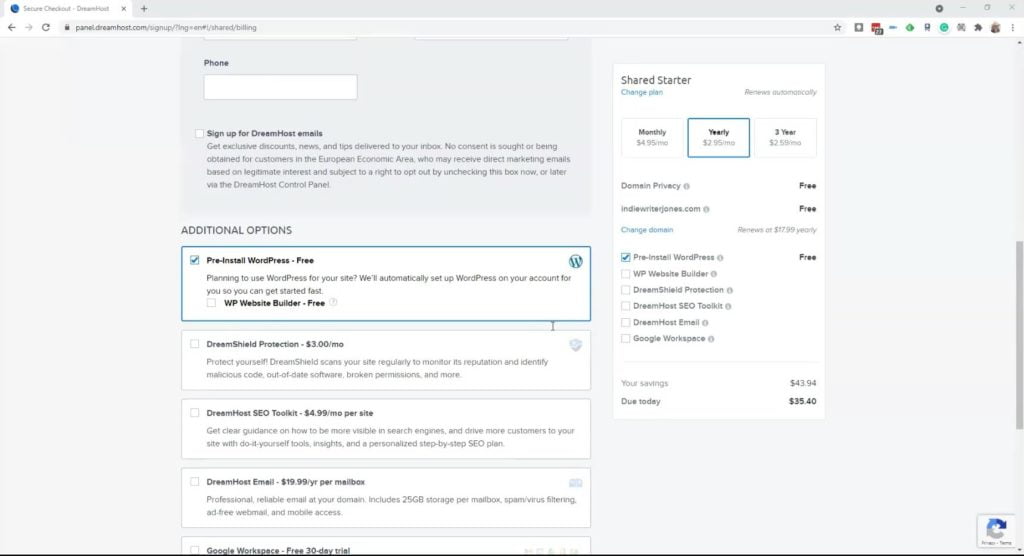
I’ve also checked the “Pre-Install WordPress” option.
I don’t need anything else, but if you want it, you can add email for $20, or a Google Workspace for $6 a month (first month free).
I do have a Google Workspace for one of my accounts, but for everything else I just forward those emails to my regular account. So, for MetaStellar, I have a bunch of email accounts for all our editors, and some of them use the DreamHost mail system, but most — including me — just have the emails forwarded to their regular Gmail accounts.
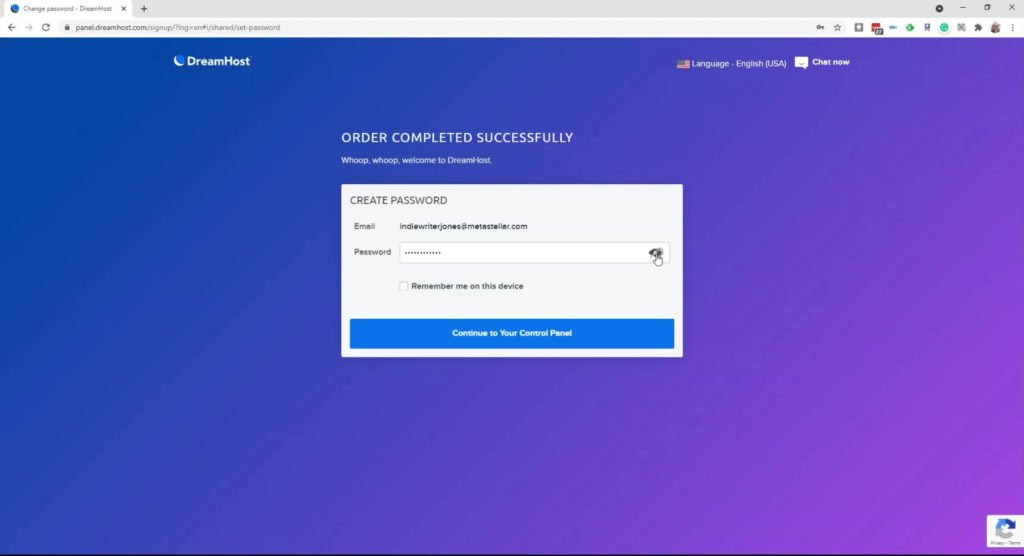
And we now have an account.
Remember your password — or use a password manager like LastPass, or Google’s password manager which is built into Chrome (I use both). You can click on the little eyeball to see the password so that you can save it somewhere.
Now click on the blue “Continue to Your Control Panel” button.
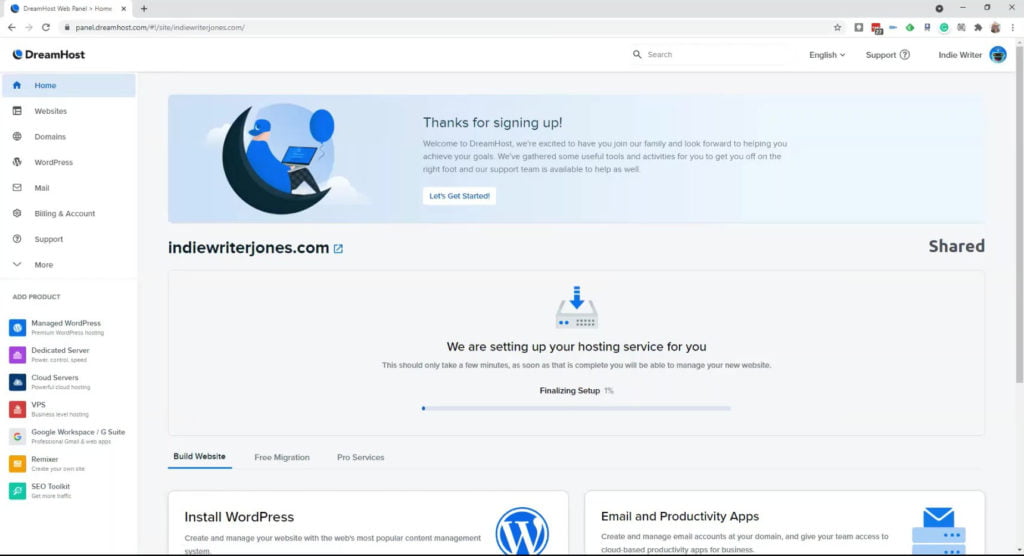
That takes you to your DreamHost account management panel. Not all the way to WordPress yet, but we’re getting there.
There’s a progress bar in the middle. The “Finalizing Setup” step can take a few minutes. For me, it took 12 minutes. I timed it.
While it’s doing this, I suggest that you bookmark this page so you can come back to it later when you want to manage your website hosting. For example, this is where you add email addresses — it’s the “Email” tab in the left-hand sidebar. Also, if you go to Websites>Secure Certificates you can add free SSL security certificate from Let’s Encrypt. They really should do this automatically. And if you go to Domains>Manage Domains and click on “Edit” under the “Web hosting” column you can add free CloudFlare support. If you go to Billing & Account>Security, you can change your password. So this is a good page to remember.
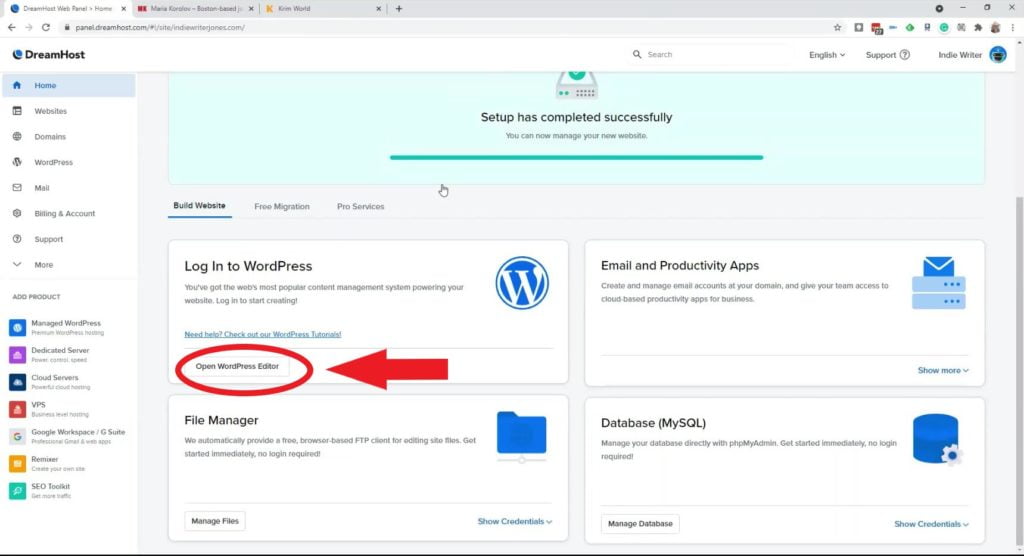
A few minutes later, and the setup is done. DreamHost has gone and registered your domain name, installed all the thousands of required WordPress files, created and configured the database. It’s all stuff we used to have to do manually! Plus, they installed a few starter WordPress themes, too, while you were waiting.
Under pain of death do not click on the “Manage Files” under “File Manager” or “Manage Database” under “Database.” You can really mess things up! If you’re a power user, DreamHost does give you full and unfettered access, for free, to all the files on your server and all your MySQL databases. But if you are like 99.999% of authors, you will never, never, ever, need to do this. And you should not give access to this panel to anyone. They don’t need it. Ask DreamHost support if you need something specific, like to add some extra security.
Instead, if you hire a designer to work on your site, create a new user account for them in your WordPress admin panel.
How do we get to that panel? I’m glad you asked. I’ve circled the button in red in the screenshot above, and put a big red arrow next to it. It’s under “Log In to WordPress” — the “Open WordPress Editor” button.
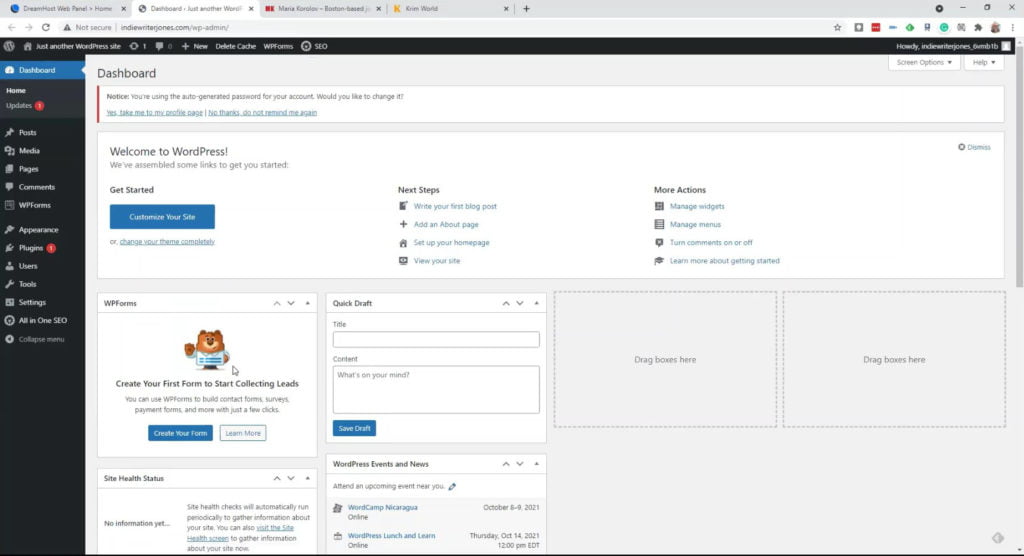
That takes you to your WordPress admin panel.
Bookmark this page. This is where you will be designing your website, installing themes, adding new users, all that good stuff.
You can see me doing all of the above in this video:

What’s next?
My recommendation, for the first thing, is to go to Appearance>Themes and activate the “Astra” theme. That’s the most popular theme out there right now and the one I’m recommending to everyone because it the least likely to get abandoned by its designers, and most likely to be compatible with all new WordPress updates, plugins, and add-ons. Plus, all the designers will know how to work with it.
Go to Users>Profile and add your name, photo, bio and change your password.
If you use a designer, go to Users>Add New and add your designer, giving them the “administrator” role so they can change your design and add plugins. If you stop working with them, just deactivate their user.
And that’s it. You have a website.
You can now go customize the website.
Most of the WordPress.com tutorials I’ve done will also work for a self-hosted site.
But here’s a quick checklist of what to do to make your website look more like one of the cool new author sites:
- Under Appearance>Themes select or add the “Astra” theme.
- Under Pages>Add New create a new page called “Home.” You can leave it empty for now. Then create a new page called “Blog.” You can leave that one empty for now as well.
- Under Appearance>Customize>Homepage Settings under “Your homepage displays” click on “A static page” and select “Home” under “Homepage” and “Blog” under “Posts page.”
- Under Appearance>Customize>Global>Typography select a font for your “Body Font Family.” I recommend “Open Sans” or another very simple sans-serif font. Then select a font for “Heading Font Family.” I suggest “Oswald” but you have unlimited scope here, really. You can come back later and play with the individual sizes of different headings.
- Under Appearance>Customize>Global>Colors select a color palette. My recommendation? Pick one bright accent color. A blue, a teal, a red, an orange — but keep everything else black, white, or gray. The text color should definitely be either black or dark gray and the content background should be white. Anything else is difficult to read. Some people do prefer a dark theme, but that should be optional, not a default. The only exceptions are if your target audience is teenage boys — Axe Body Spray, for example, has white text on a black background, as do some video game websites.
- Under Appearance>Customize>Global>Container select under “Layout” select “Full Width / Stretched,” under “Page Layout” select “Full Width / Stretched,” under “Blog Post Layout” select “Content Boxed,” and under “Archives Layout” select “Full Width / Stretched.”
- Under Appearance>Customize>Site Idenity set your site title and logo — upload a logo file or just type your author name in all caps. If you upload a logo, uncheck “Display Site Title.” And also uncheck “Display Site Tagline” — most author sites don’t have one. This is where you upload a sign icon, too. That could be a square image of just your initials, or a little icon like a rocket ship or something like that. It has to be super simple. It’s what shows up as the little logo in the browser tab when people visit your site. It’s also known as a “favicon.” You can create one here.
- Under Appearance>Customize>Sidebar under “Default Layout” select “No Sidebar.”
- Hit the blue “Publish” button at the top of the “Customize” panel.
- Then go back and edit your home page and blog page — under Pages>All Pages. Add content blocks, upload images and text, all that good stuff. I also suggest adding a separate page for each book or story you’ve written, as well as a “Bio” page and a “Contact” page. Then add a few blog posts under Posts>Add New. These could be announcements of upcoming releases, your thoughts on puppies and kittens, insights into your writing process, or reviews of your favorite books.
You ask a designer to design a home page for you based on an example of another writer’s site that you like — or you can pick and choose elements from different sites. I also have a couple of tutorials up, including Setting up an author website: Before you start on how to find or create content for your site, Free author website: initial setup, which covers how to create a free WordPress.com site — you can skip that — and setting up your home page. Also check out Website basics: How to create a row of books which takes you through how to use Gutenberg blocks to create a row of books panel on your home page in several different ways. I’ll be adding more tutorials, as well, so bookmark our Website design tag and check back.
Edited by Melody Friedenthal
MetaStellar editor and publisher Maria Korolov is a science fiction novelist, writing stories set in a future virtual world. And, during the day, she is an award-winning freelance technology journalist who covers artificial intelligence, cybersecurity and enterprise virtual reality. See her Amazon author page here and follow her on Twitter, Facebook, or LinkedIn, and check out her latest videos on the Maria Korolov YouTube channel. Email her at maria@metastellar.com. She is also the editor and publisher of Hypergrid Business, one of the top global sites covering virtual reality.

